

How to Build an A-Frame
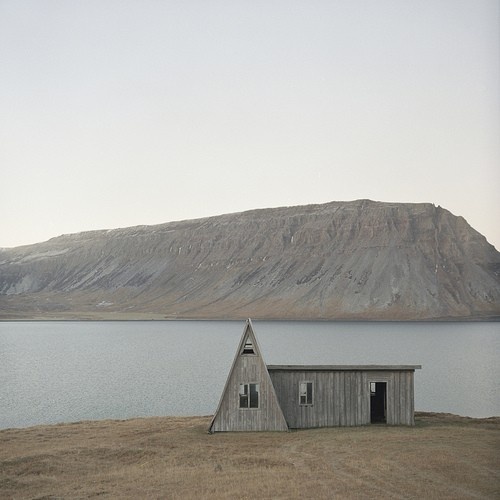
Whether you’re looking to build a rustic retreat or the off-grid home you’ve long dreamed about, the A-frame cabin offers a simple, incredibly sturdy and comparatively low-cost option.
November 25, 2011
http://www.motherearthnews.com/diy/how-to-build-an-a-frame-ze0z1111zhir.aspx
From Fox Chapel Publishing
Want to build a sophisticated cottage home, a low-key vacation cabin or anything in between? “Cabins & Cottages” has the know-how you need to get started confidently and finish beautifully. This detailed, color-illustrated guide pilots you through all of the pre-building considerations, such as assessing and preparing your site, and then lays out step-by-step instructions for fashioning four structures: a classic log cabin, an A-frame cabin, a cottage of prefab panels, and a house suspended on poles. You’ll also learn how to equip your new lodging with heat, running water and all of the other comforts of home.
COVER: FOX CHAPEL PUBLISHING
The following is an excerpt from Cabins & Cottages (Fox Chapel Publishing, 2011). Ready to make the leap from sheds and chicken coops to larger-scale DIY projects? Or just looking to expand your repertoire of carpentry skills? Meet Cabins & Cottages, your comprehensive resource for building simple, affordable, permanent living spaces. From the woodworking and crafting pros at Fox Chapel Publishing, Cabins & Cottages leaves no know-how stone unturned, and it details how to design and build your structures to withstand some of the worst Mother Nature can dish out (heavy snow, flooding, high winds), making the book a worthy companion for any builder. This excerpt is from Chapter 3, “Four Simple Structures.”
One of the sturdiest of all structures is the A-frame, whose skeleton consists simply of a row of triangles. The bases of the triangles are the joists that support the floor, and the sides are the rafters that hold the combined walls and roof. The simplicity of construction and comparatively low cost make it a popular choice for vacation cabins or an off-grid home. Any style of foundation can serve as its base.
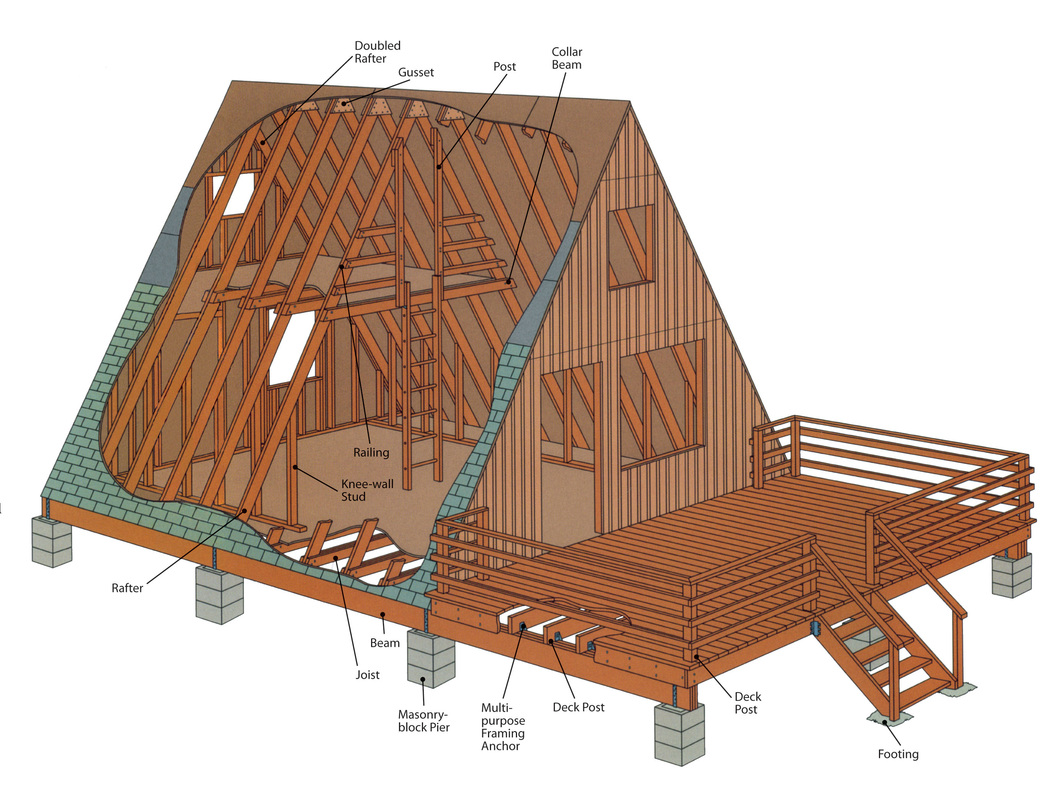
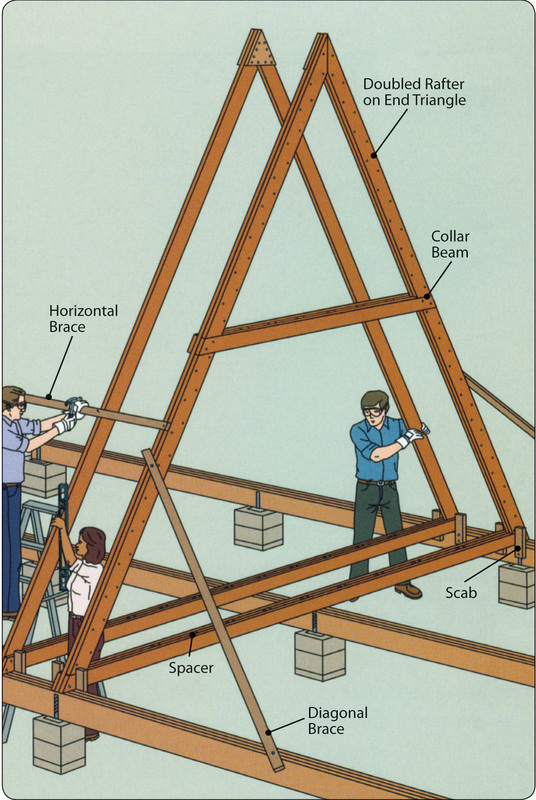
Planning Your A-FrameAs you read this article, you’ll likely find it helpful to reference this labeled illustration of the completed A-frame. — MOTHER
The most common shape is equilateral — joists and rafters are equal in length and set at angles of 60 degrees to each other. You can use different angles to modify the shape, however (see “Common Floor-to-Rafter Angles,” below). An A-frame can be built to almost any size simply by varying the number of triangles and their dimensions, but a cabin with a sleeping loft must have rafters at least 20 feet long to allow adequate headroom on both floors. For a small structure like the one described here, three people can lift the assembled triangles into place without the assistance of special equipment. A structure with rafters greater than 24 feet may prove too unwieldy for a crew of amateurs. Frame doors and windows in the end walls. For a large A-frame, plan a lot of windows to keep the interior from being too dark.
A-Frame ToolsScrewdriver
Circular saw
C-clamps
Electric drill
Hammer
Carpenter’s level
Carpenter’s square
Plumb bob
Wrench
Saber saw
A-Frame Materials1-by-2s, 2-by-4s
2-by-6s, 2-by-8s
Pressure-treated 2-by-6s, 2-by-10s, 4-by-4s
Exterior-grade plywood (3/4-inch)
Wood glue
Common nails (2-inch, 2 1/2-inch, 3 1/2-inch)
Galvanized common nails (2 1/2-inch, 3-inch, 3 1/2-inch)
Ring-shank nails (2 1/2-inch)
Wood screws (1 3/4-inch No. 8)
Roofing materials
Carriage bolts (5/8-inch-by-6-inch; 1/2-inch-by-4-inch, 6-inch)
Lag screws (1/2-inch-by-4-inch)
Multipurpose and framing anchors and nails
Wooden ladder
Concrete mix
Anatomy of an A-FrameThis 20-foot-per-side equilateral A-frame rests on tripled 2-by-10 pressure-treated beams supported by masonry block piers. The triangles, spaced 24 inches apart, are formed of 2-by-8 rafters joined at the apexes with plywood gussets and sandwiched at the bottom by pairs of pressure-treated 2-by-6 joists. (A cabin larger than this structure would require correspondingly larger framing lumber.) At the end walls and under the sleeping loft, horizontal 2-by-6 collar beams are fastened between the rafters. The rafters of the end walls are doubled to provide a flush nailing surface for the exterior sheathing. The sleeping loft, reached by a ladder, is framed by a railing secured to posts and rafters. Knee walls along the sides of the cabin provide concealed storage areas. The deck rests on 2-by-6 joists set 16 inches apart. Posts for the railing are secured to the deck joists. The stairs are set on concrete footings and are attached to the deck with metal framing anchors. All exposed wood is pressure-treated lumber. An asphalt-shingle roof is shown.
Common Floor-to-Rafter Angles(Rafter length, joist length, rafter/joist angle, rafter/rafter angle)
16 feet, 12 feet, 68 degrees, 22 degrees
16 feet, 14 feet, 64.1 degrees, 26 degrees
16 feet, 16 feet, 60 degrees, 30 degrees
20 feet, 12 feet, 72.5 degrees, 17.5 degrees
20 feet, 14 feet, 69.5 degrees, 20.5 degrees
20 feet, 16 feet, 66.4 degrees, 23.6 degrees
20 feet, 20 feet, 60 degrees, 30 degrees
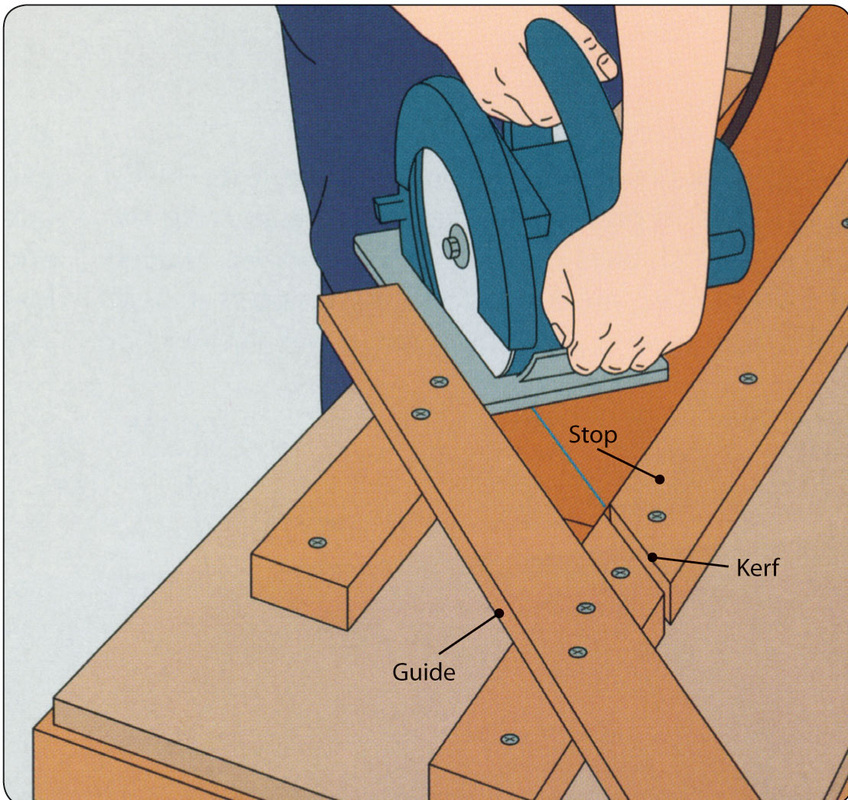
Cutting A-Frame Joists and RaftersTo cut the joists and rafters quickly, make a jig for each angle to be cut.
Mark a scrap board at the angle of the joists or rafters and set it on a work surface.
Place a 2-by-4 on each side of the board and fasten them down with screws.
Align a 1-by-2 with the mark and screw it to the 2-by-4s as a cutting guide.
Run a circular saw along the guide, cutting a kerf through all three boards.
Remove the scrap board and replace it with a joist or rafter, marked to length. Align the mark with the kerf and cut the board (see illustration). Cut the other end so both cuts angle toward the middle.
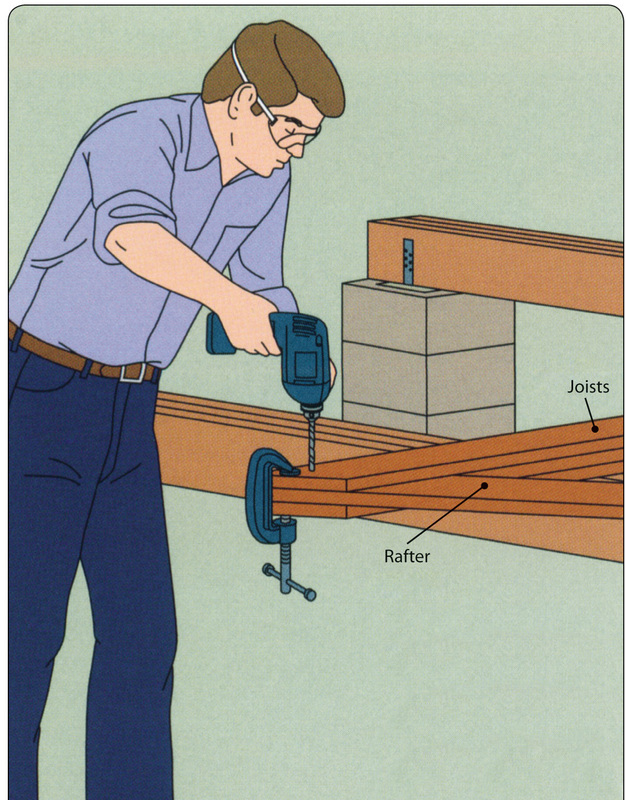
Assembling the A-Frame TrianglesClamp the ends of two joists around the base of a rafter, aligning the ends and edges of the boards, and drill a 5/8-inch hole through the three layers (see illustration).
Fasten the boards together with a 5/8-by 6-inch carriage bolt, washer and nut.
Bolt the opposite ends of the joists to the base of another rafter in the same way.
From 3/4-inch exterior-grade plywood, cut two triangular gussets to the same angle as the A-frame.
Butt the top ends of the rafters together and fasten the gussets to each side of the seam with wood glue and 1 3/4-inch No. 8 wood screws (see illustration).
Add a second carriage bolt to each joist-rafter joint.
Assemble the remaining triangles in the same way, but secure gussets to just one side of each end triangle.
Allowing for at least 7 feet of headroom, mark both rafters of each triangle at the end walls and under the loft for collar beams. For each triangle, cut two collar beams to fit between the outside edges of the rafters, and then bolt them on as you did the joists.
Cut 1-by-2 spacers to the joist width and fasten them with 2-inch common nails between all of the pairs of joists and collar beams at 2-foot intervals.
Double the rafters of the end triangles: Cut four lengths of rafter lumber — two to fit between the joists and collar and two between the beams and rafter peaks — and nail them to the outsides of the rafters with 2 1/2-inch nails.
Erecting the A-Frame TrianglesMark the triangle locations on the beams at 2-foot intervals.
Nail scabs — 1-foot-long 2-by-4s — to the insides of the outer beams on each side of the marks for the front end triangle.
With a pair of helpers, lift and position the end triangle on the beam between the scabs.
Plumb the triangle and brace it with two 2-by-4s nailed diagonally between the rafters and outer beams so the top of each brace is least 4 1/2 feet from the base of the rafters.
Position and plumb the remaining triangles in the same way, bracing them with a 1-by-2 nailed to each side of the adjacent triangle (see illustration).
When all of the triangles have been braced, remove the scabs and attach the triangles to the beams, installing a multipurpose framing anchor to each side of every joist. In a high-wind area, use hurricane ties. Nail the bottom corners of the triangles to the beams.
Sheathe the outside of the frame, laying decking for shakes, or 4-by-8 panels of 5/8-inch exterior-grade plywood for metal roofing or asphalt shingles. Work from bottom to top, fastening the sheathing with 2 1/2-inch common nails. Leave a 1/8-inch gap around panels and stagger the joints. Remove the bracing after you lay the bottom course of panels.
Cover the floor with plywood.
Finishing TouchesIf the A-frame includes a loft, provide it with stairs or a ladder and a sturdy railing. Rest a deck, if you build one, on the same foundation as the main structure and surround it with a railing. Buy deck stairs at a building center or construct them on site. Install insulation between the floor joists, rafters and end wall studs as you build.
Reprinted with permission from Cabins & Cottages, published by Fox Chapel Publishing, 2011.
Whether you’re looking to build a rustic retreat or the off-grid home you’ve long dreamed about, the A-frame cabin offers a simple, incredibly sturdy and comparatively low-cost option.
November 25, 2011
http://www.motherearthnews.com/diy/how-to-build-an-a-frame-ze0z1111zhir.aspx
From Fox Chapel Publishing
Want to build a sophisticated cottage home, a low-key vacation cabin or anything in between? “Cabins & Cottages” has the know-how you need to get started confidently and finish beautifully. This detailed, color-illustrated guide pilots you through all of the pre-building considerations, such as assessing and preparing your site, and then lays out step-by-step instructions for fashioning four structures: a classic log cabin, an A-frame cabin, a cottage of prefab panels, and a house suspended on poles. You’ll also learn how to equip your new lodging with heat, running water and all of the other comforts of home.
COVER: FOX CHAPEL PUBLISHING
The following is an excerpt from Cabins & Cottages (Fox Chapel Publishing, 2011). Ready to make the leap from sheds and chicken coops to larger-scale DIY projects? Or just looking to expand your repertoire of carpentry skills? Meet Cabins & Cottages, your comprehensive resource for building simple, affordable, permanent living spaces. From the woodworking and crafting pros at Fox Chapel Publishing, Cabins & Cottages leaves no know-how stone unturned, and it details how to design and build your structures to withstand some of the worst Mother Nature can dish out (heavy snow, flooding, high winds), making the book a worthy companion for any builder. This excerpt is from Chapter 3, “Four Simple Structures.”
One of the sturdiest of all structures is the A-frame, whose skeleton consists simply of a row of triangles. The bases of the triangles are the joists that support the floor, and the sides are the rafters that hold the combined walls and roof. The simplicity of construction and comparatively low cost make it a popular choice for vacation cabins or an off-grid home. Any style of foundation can serve as its base.
Planning Your A-FrameAs you read this article, you’ll likely find it helpful to reference this labeled illustration of the completed A-frame. — MOTHER
The most common shape is equilateral — joists and rafters are equal in length and set at angles of 60 degrees to each other. You can use different angles to modify the shape, however (see “Common Floor-to-Rafter Angles,” below). An A-frame can be built to almost any size simply by varying the number of triangles and their dimensions, but a cabin with a sleeping loft must have rafters at least 20 feet long to allow adequate headroom on both floors. For a small structure like the one described here, three people can lift the assembled triangles into place without the assistance of special equipment. A structure with rafters greater than 24 feet may prove too unwieldy for a crew of amateurs. Frame doors and windows in the end walls. For a large A-frame, plan a lot of windows to keep the interior from being too dark.
A-Frame ToolsScrewdriver
Circular saw
C-clamps
Electric drill
Hammer
Carpenter’s level
Carpenter’s square
Plumb bob
Wrench
Saber saw
A-Frame Materials1-by-2s, 2-by-4s
2-by-6s, 2-by-8s
Pressure-treated 2-by-6s, 2-by-10s, 4-by-4s
Exterior-grade plywood (3/4-inch)
Wood glue
Common nails (2-inch, 2 1/2-inch, 3 1/2-inch)
Galvanized common nails (2 1/2-inch, 3-inch, 3 1/2-inch)
Ring-shank nails (2 1/2-inch)
Wood screws (1 3/4-inch No. 8)
Roofing materials
Carriage bolts (5/8-inch-by-6-inch; 1/2-inch-by-4-inch, 6-inch)
Lag screws (1/2-inch-by-4-inch)
Multipurpose and framing anchors and nails
Wooden ladder
Concrete mix
Anatomy of an A-FrameThis 20-foot-per-side equilateral A-frame rests on tripled 2-by-10 pressure-treated beams supported by masonry block piers. The triangles, spaced 24 inches apart, are formed of 2-by-8 rafters joined at the apexes with plywood gussets and sandwiched at the bottom by pairs of pressure-treated 2-by-6 joists. (A cabin larger than this structure would require correspondingly larger framing lumber.) At the end walls and under the sleeping loft, horizontal 2-by-6 collar beams are fastened between the rafters. The rafters of the end walls are doubled to provide a flush nailing surface for the exterior sheathing. The sleeping loft, reached by a ladder, is framed by a railing secured to posts and rafters. Knee walls along the sides of the cabin provide concealed storage areas. The deck rests on 2-by-6 joists set 16 inches apart. Posts for the railing are secured to the deck joists. The stairs are set on concrete footings and are attached to the deck with metal framing anchors. All exposed wood is pressure-treated lumber. An asphalt-shingle roof is shown.
Common Floor-to-Rafter Angles(Rafter length, joist length, rafter/joist angle, rafter/rafter angle)
16 feet, 12 feet, 68 degrees, 22 degrees
16 feet, 14 feet, 64.1 degrees, 26 degrees
16 feet, 16 feet, 60 degrees, 30 degrees
20 feet, 12 feet, 72.5 degrees, 17.5 degrees
20 feet, 14 feet, 69.5 degrees, 20.5 degrees
20 feet, 16 feet, 66.4 degrees, 23.6 degrees
20 feet, 20 feet, 60 degrees, 30 degrees
Cutting A-Frame Joists and RaftersTo cut the joists and rafters quickly, make a jig for each angle to be cut.
Mark a scrap board at the angle of the joists or rafters and set it on a work surface.
Place a 2-by-4 on each side of the board and fasten them down with screws.
Align a 1-by-2 with the mark and screw it to the 2-by-4s as a cutting guide.
Run a circular saw along the guide, cutting a kerf through all three boards.
Remove the scrap board and replace it with a joist or rafter, marked to length. Align the mark with the kerf and cut the board (see illustration). Cut the other end so both cuts angle toward the middle.
Assembling the A-Frame TrianglesClamp the ends of two joists around the base of a rafter, aligning the ends and edges of the boards, and drill a 5/8-inch hole through the three layers (see illustration).
Fasten the boards together with a 5/8-by 6-inch carriage bolt, washer and nut.
Bolt the opposite ends of the joists to the base of another rafter in the same way.
From 3/4-inch exterior-grade plywood, cut two triangular gussets to the same angle as the A-frame.
Butt the top ends of the rafters together and fasten the gussets to each side of the seam with wood glue and 1 3/4-inch No. 8 wood screws (see illustration).
Add a second carriage bolt to each joist-rafter joint.
Assemble the remaining triangles in the same way, but secure gussets to just one side of each end triangle.
Allowing for at least 7 feet of headroom, mark both rafters of each triangle at the end walls and under the loft for collar beams. For each triangle, cut two collar beams to fit between the outside edges of the rafters, and then bolt them on as you did the joists.
Cut 1-by-2 spacers to the joist width and fasten them with 2-inch common nails between all of the pairs of joists and collar beams at 2-foot intervals.
Double the rafters of the end triangles: Cut four lengths of rafter lumber — two to fit between the joists and collar and two between the beams and rafter peaks — and nail them to the outsides of the rafters with 2 1/2-inch nails.
Erecting the A-Frame TrianglesMark the triangle locations on the beams at 2-foot intervals.
Nail scabs — 1-foot-long 2-by-4s — to the insides of the outer beams on each side of the marks for the front end triangle.
With a pair of helpers, lift and position the end triangle on the beam between the scabs.
Plumb the triangle and brace it with two 2-by-4s nailed diagonally between the rafters and outer beams so the top of each brace is least 4 1/2 feet from the base of the rafters.
Position and plumb the remaining triangles in the same way, bracing them with a 1-by-2 nailed to each side of the adjacent triangle (see illustration).
When all of the triangles have been braced, remove the scabs and attach the triangles to the beams, installing a multipurpose framing anchor to each side of every joist. In a high-wind area, use hurricane ties. Nail the bottom corners of the triangles to the beams.
Sheathe the outside of the frame, laying decking for shakes, or 4-by-8 panels of 5/8-inch exterior-grade plywood for metal roofing or asphalt shingles. Work from bottom to top, fastening the sheathing with 2 1/2-inch common nails. Leave a 1/8-inch gap around panels and stagger the joints. Remove the bracing after you lay the bottom course of panels.
Cover the floor with plywood.
Finishing TouchesIf the A-frame includes a loft, provide it with stairs or a ladder and a sturdy railing. Rest a deck, if you build one, on the same foundation as the main structure and surround it with a railing. Buy deck stairs at a building center or construct them on site. Install insulation between the floor joists, rafters and end wall studs as you build.
Reprinted with permission from Cabins & Cottages, published by Fox Chapel Publishing, 2011.
